
So we return to the this tutorial,
Panel 5 - Iris's / Rock Roses and Forget Me Not's.
Materials used: Dissolvable canvas, 7mm ribbon in buttercup & custard colours, 6mm organza ribbon in lemongrass, 7 mm silk ribbon in lemon grass, DMC 369, 793, 3733 Anchor 300, 4mm sick ribbon pink/fuchsia.
This is the first time we work using the ribbon, on a separate medium, remove it then attach it to the ground fabric.
So I mounted the soluble canvas in a hoop and using the 7mm butter cup ribbon about 55cms long, brought the needle up to the front leaving a 2 cm tail at the back and made a puffed detached chain, about 15mm long. I brought the needle up through the starting point piercing the tail on the back at the same time to anchor it all.
I had to hold the tail to the back of the canvas each time a stitch was made, this ensures when you dissolve the canvas the ribbon won't unravel. I added some green organza in on the buds to simulate leaves.
So I repeated until I had enough Iris's & buds required. 
the tails look untidy but once you have dissolved the canvas you can tidy things up before attaching to the ground fabric.
So the next job is to dissolve the canvas, I cut round the shapes and dissolved in a bowl of water. 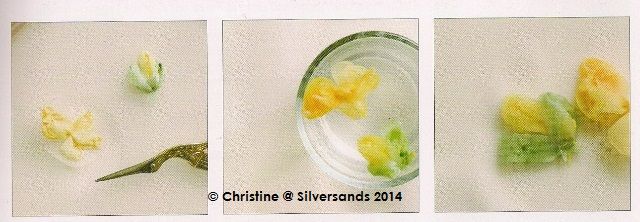
And this is what they look like when dried. 
Next job is to tack them in place, on the ground fabric.

As you can see I have tacked them once in the middle to the ground fabric and left long tails, this is so that I can anchor them fully after the wire stems are in place, tidy them up and tack the petals down in the position I want.
The next job is to add the wire stems, so I cut the cake wire in to 5 measuring the length from under the iris to the base, then couched over the wires all the way down with DMC 369. I then added green 4mm Shrub coloured ribbon in twisted straight stitch (we covered how to do this in previous panels)for the leaves and we end up with this.
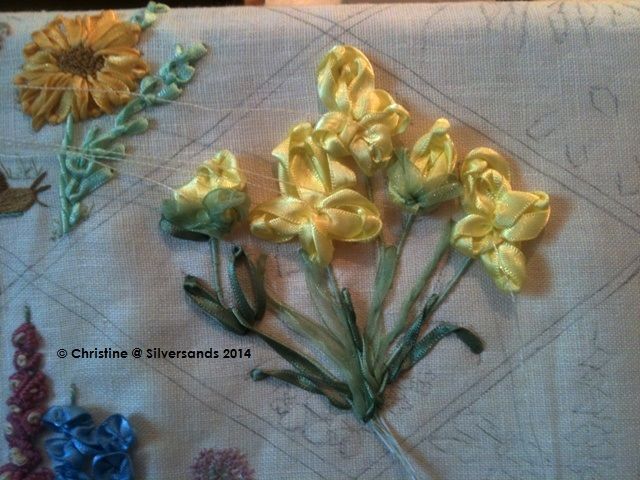
You can see the wires poking out the bottom, this is fine as the rock roses and forget me knots and leaves will cover, so instead of pushing them through to the back, I just cut them off. & You can still see the tacking threads loose on the iris, now that the leaves and stems are in, the iris's can be anchored down in position. Leaving them loose and floaty before the wire stems are in helps when you need to lift them up to cover the top of the wire stems when couching over them.
The next job is to create spider web roses. This is so easy and effective, bringing the needle up you create 5 arms
so you have a a sort of 5 sided star shape like this

Bring the 4 mm fushia ribbon up close to the center of the shape then weave it over and under each bar, continuing round untill you have covered all the bars, and you end up with this.

You can see I have completed one, and have started the 2nd. There are four of these rock roses in 2 different colours, then on the other side of the stems, I then created forget me not's using tiny flat ribbon stitches and the center dotted with yellow French knots.
I created leaves in amongst them with detached chain stitch (covered in a previous panel), and dotted the whole area in French knots in DMC 369, 793 & 3733
And we finish with this.

now I may go back and add more foliage to fill space but I shall see how it looks when it is surrounded by other panels. Sometimes less is more but this needs deciding on later.
So this is panel 5. Our next panel is Hydrangeas &; wisteria, part of this also involves working off the main ground fabric to create the hydrangeas and I am quite looking forward to it . Till next time


No comments:
Post a Comment
Note: only a member of this blog may post a comment.